The luxurious silk pouch contains 1o filters for the face mask De Luxe. The washable filters are Spunbonded Non-Woven 100% Polypropylene, which are the filters recommended by the WHO. The pouches are made of left-over silk and therefor come in various random colours. The (empty) pouch can also be used to keep your face mask in between wears.
These washable face mask filters are especially made to fit our Silk face mask de Luxe. The filters are sewn to fit perfectly in the pocket on the backside of the face mask. Instructions for use:
Remove the filter when washing the mask. If you want to wash both , you don’t have to remove the filter.
Wash the filter with hand wash on 30 degrees. Wash the filter with soap and scrub them for at least 20 seconds with warm to hot water before drying.
Air dry the filter
Put it back in the mask before wearing. Make sure the side with wire is inserted first. This results in that the wire can be shaped over your nose.
MATERIAL AND CARE
Pouch 100% silk
Pouch and filter can be washed on 60° machine wash
The included filter is Spunbond non-Woven 100% Polypropylene
Please note that face masks filters are considered a personal use item. That means that we are not offering returns or exchanges as we normally do with other items.
ABOUT THE PRODUCT
The Fabric:
The pouches are produced, as far as possible, from left–over silk or silk-mix fabric. We use the fabric, which remains left when cutting the masks and garments. We try to produce as little waste as possible.
PRODUCTION
The masks are crafted by our skilled seamstresses in our atelier in Lithuania. We have visited the atelier numerous time and a great collaboration. The employees work in very good conditions and get a decent salary.
Read more about our sustainable production, materials and factories atstudioheijne.com.
Reviews
There are no reviews yet.
Be the first to review “Silk pouch with 10 filters-Face mask de Luxe” Cancel reply
The videos show you how to take your body measurements correctly. The video guide is language accompanied and we recommend turning on the volume.
Let´s start taking your measurements. You need a measurement tape and 5 minutes of your time. Put yourself in front of a mirror, this can help. Wear tight clothes or only underwear for the best result.
To measure your chest, position and pull the tape measure around your body where your chest is as broadest (under your armpits, around your back and back to the front) to get the right measure.
Fold the measurement tape around your natural waist, where it is as smallest, a few cm above your belly bottom. Keep it parallel to the floor. Avoid holding your breath or pulling your stomach.
TIP: If you are unsure, measure 21 cm straight down from the chest. There is your most defined waist according to our measurement system.
Pull the tape around the widest part of your hips. Adjust the tape measure slightly up and down to ensure that it is the widest part. Look in the mirror to assure you keep the tape straight.
Measure from top of shoulder to desired length.
For dresses measure first to your hips, then bend and adjust measurement tape to
get the right length. For asymmetrical dresses measure to the shortest part of the
dress.
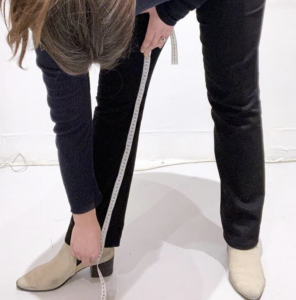
For skirt length: Place the tape on your earlier defined waist. Hold the tape on your knee and secure the tape with one hand. Bend forward and measure to the length desired. Measure from your waist (earlier defined) to length desired. For asymmetrical skirts measure to the shortest part of the skirt.
Are you experiencing that the sleeves of your top or dress often too tight around your biceps? We recommend measuring your biceps and adjust the measurement.
Define your biceps by bowing your arm and tensing your muscles. Measure around the widest part of your upper arm.
Measure the exact sleeve length you want. Place the tape on your shoulders and measure to your elbow. Hold the tape on your elbow and let go of the upper part. Then measure the final length from your elbow to the length desired.
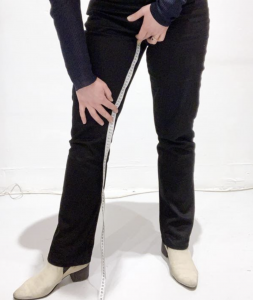
Measure the inside of your leg: Place the tape directly under your crotch and measure first to your knee.
Hold the tape on your knee and let go the upper part. Then measure the final length from your knees to the length desired.
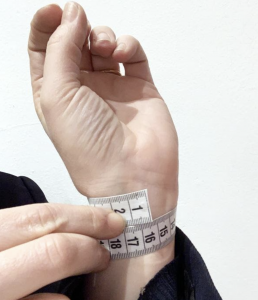
Place the measuring tape around your wrist and check the measurement.
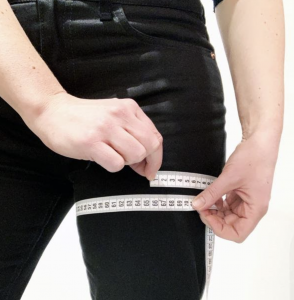
Hold your leg straight and place the measuring tape tight around your thigh.
Pay attention that the measuring tape is placed on the largest part of your thigh
Hold your leg straight and place the measuring tape tight around your knee. Pay attention that the measuring tape is placed in the middle of your kneecap.
Place the measuring tape around the fullest part of your calf for the right measurement. Pay attention that the measuring tape is placed straight.
Size guide for standard sizes
BODY MEASUREMENT in cm
Studio Heijne uses the Germanic size system (DK/SE/NL/DE/AT)
We recommend to use this size chart as a base for made-to-measure styles and adjust the sizing to become your personal measurements. Perfect fit guarantee: We offer a perfect fit guarantee. This means that we always make sure the made-to-measure garments will fit perfectly. If you, against all odds, are not satisfied, we offer a refund within 30 days of purchase.


Reviews
There are no reviews yet.